

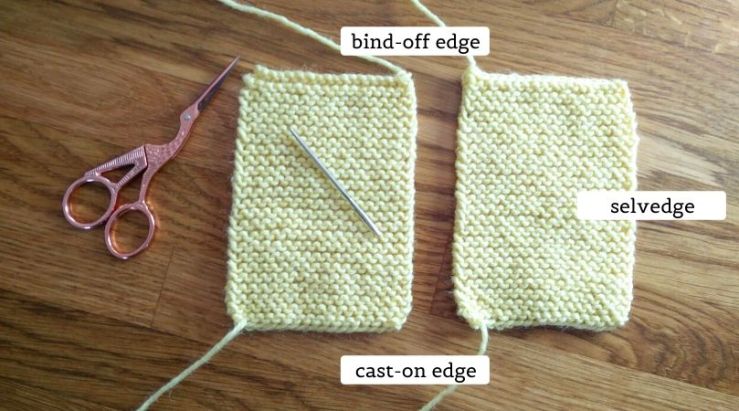
When you first learn to knit, you often knit scarves and dishcloths because they are simple rectangular shapes (also because they are great!). You cast on a set amount of stitches, and you knit a set amount of rows, bind off, and you’re done. However, if you learn how to join knitted pieces of fabric together, you will greatly expand the arsenal of potential knitting projects that you can make. Let me introduce, the mattress stitch!
The Mattress stitch seam
The mattress stitch is a finishing technique for seaming the edges of knitwork. It is near invisible on the right side (i.e. the outside of a garment) and has a sturdy, raised seam on the wrong side (i.e. the inside of a garment). It works a little differently for different stitch patterns, such as garter stitch and stockinette stitch. It’s also different for vertical seams where you connect rows of knitting (i.e. the selvedges), and for horizontal seams where you connect columns of knitting (i.e. the cast-on and bind-off edges). The underlying principle of the mattress stitch is to replicate the look of the stitches to make a seamless join.
In this article, I will guide you through how to make a vertical seam with the mattress stitch for garter stitch fabric. In future articles, I will cover horizontal seams and the mattress stitch for stockinette stitch fabric. Sign up for the newsletter to stay in the loop (use the link at the bottom of this page and get a free pattern that employs the technique taught in this tutorial).
Garter stitch
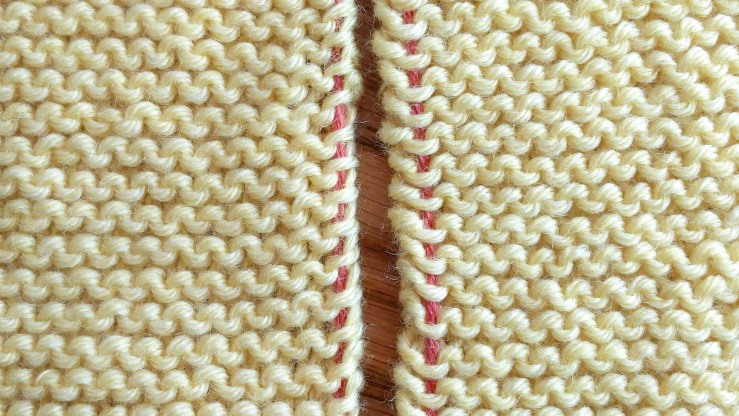
For most of us, garter stitch is the first thing we learn to knit. It is the fabric you produce when you knit every stitch of every row. Garter stitch is recognized by the distinct horizontal ridges that are made up of little bumps, shaped like frowns and smiles. The two sides of the fabric look almost identical, with the only difference being a shift in the position of the ridges. Note that each ridge is actually made up of two knitted rows. When you seam the selvedges of garter stitch fabric, you want to connect the ridges two and two.
Place the two pieces of garter stitch fabric next to each other with the selvedges almost touching and align the ridges that you will be connecting. The cast-on and bind-off edges look different on the two sides of the fabric so make sure the two fabric pieces have the same side facing up. You will be sewing the mattress stitch on the side of the fabric that will be facing outward so think about which side you want that to be.
How to do the mattress stitch seam for garter stitch fabric
The trick to remember is that you will be connecting frowns on the left with smiles on the right! I have marked the frowns and smiles with a contrasting piece of yarn in the photo below to clarify which stitches you will use for the seam. On the left-hand piece, it is the last frown of every ridge, and on the right-hand piece, it is the last smile of every ridge. If the last smile is the actual edge stitch, you will get a cleaner seam if you select the second to last smiles.
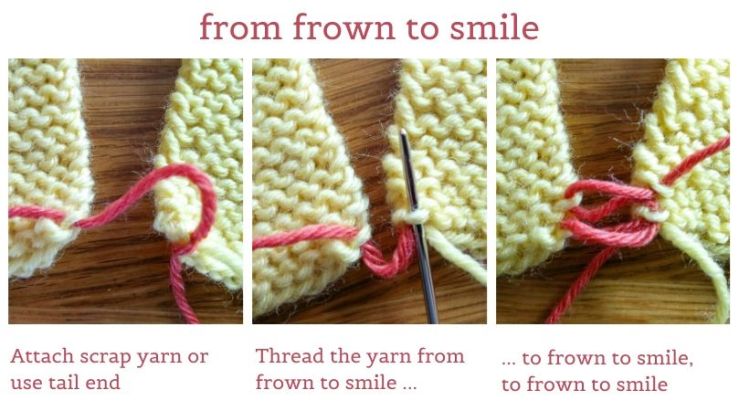
Generally, you will want to use the same yarn that you’ve been knitting with to make the seam. A clever trick is to leave the cast-on tail and bind-off tail nice and long, and use them to seam the edges together. I am using a contrast-color yarn in this guide because it’s easier to see what is going on. That means I had to attach the yarn to one of the corners before I started to sew. You may sometimes have to do this because the yarn tail is at the wrong corner, or maybe you cut it too short. It’s not super important how you attach the yarn to the corner. Here, I simply looped the yarn around the same corner stitch twice. A neater way to do it is to pretend you are weaving in a yarn tail on the backside of the work, finishing with passing the needle through to the front through the corner stitch.
Using a yarn needle, begin sewing the mattress stitch by sewing upwards through the selected edge stitches, frowns on the left, smiles on the right. Always pass the needle through the stitches from the bottom to the top, i.e. in the direction away from you. Make sure you are grabbing a stitch from every ridge and matching it up with a stitch on the corresponding ridge on the other piece. Don’t pull the yarn tight before you have joined several stitches.
It may look a bit messy at first, but once you tighten it, the stitches will join up seamlessly. Take it slowly, one ridge at a time. First, check you are on the right ridge. Second, if you are picking up a stitch on the left-hand piece, remind yourself it’s a frown (or right-hand it’s a smile) and locate the correct stitch. Pass the needle through, move to the other side, and repeat. When you have seamed a handful of stitches you can tighten by pulling gently on the working yarn, but you can also wait till you have completed the entire thing for an even more satisfying experience.

The near-invisible mattress stitch seam
When you get to the end of the edge you can pass the needle through to the backside and weave the yarn tail into the raised seam to secure it. The mattress stitch joins the knitted pieces together in a way that is seamless on the right side of the work, and with a sturdy seam on the wrong side of the work. This makes it very useful e.g. for knitted sweaters where the seams experience significant stress during wear.

Sign up for the newsletter and receive a free pattern – Easy Easter Egg Warmers
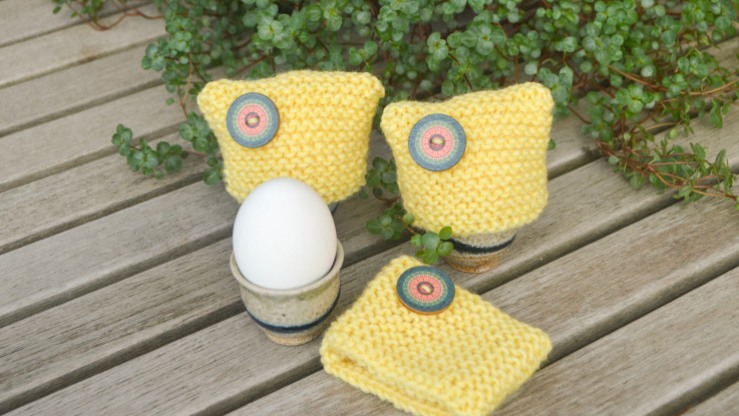
It’s always good to have a quick project to practice a new technique. Here’s a cute pattern for Easy Easter Egg Warmers to practice the mattress stitch on. Click the photo below to read more about the pattern and subscribe to receive a copy of the pattern!
I wish this had landed on my post 2 days agoi! I have just had to sew together panels of a blanket where the edge stitches were either in purl( right side) or knit (wrong side) it didn’t make for a very neat edge (esp the purls) and just couldn’t sew without it forming a ridge.
(My mom had always been the blanket knitter but she passed on a year ago 😦 and wasn’t there to ask what her sewing technique was.)
Pls recommended to me what the BEST way to begin and end rows are for sewing .an invisible seam like this. I used to slip stitch all first stitches but then went and changed with this blanket because the pattern on either side of the cable was 3 stitches of purl.
SO LOOK FORWARD to your guidance.
Hi Ynor, with the mattress stitch you still get a seam on the wrong side, so if that bothers you it might not be the best choice for your blanket. Do you know a little crochet as well? I have seen beautiful blankets made from knitted squares, where each square was framed by crochet, seamlessly connecting the squares to a blanket. If you are okay with seams on the wrong side of the blanket, then the mattress stitch is an excellent choice. It does not matter what edge you have because the edges are hidden in the seam on the wrong side. No need to slip stitches. You will need to look up how to do the mattress stitch for all types of edges you will be joining. For example cast on edge to bind off edge and purlside to knit side vertical seam. It should be relatively easy to find now that you know, it’s called a mattress stitch, but give me a shout if you can’t find what you need.
What is the difference between how the mattress stitch and Kitchener stitch look?
You use the mattress stitch for the edges (end of knitting rows, i.e. the sides) of two knitted pieces of fabric. You use the kitchener stitch for grafting two rows of live stitches together.
I appreciate your clear guidance. I’ve been knitting for years, and I realize that I should have taken sewing seams together much more seriously. Thank you so very much!